Saturday, November 3, 2012

Upcycle Monthly: Featuring Leah from Crunchy Farm Baby

Let's all take a moment to get to know Leah of Crunchy Farm Baby on Etsy.  Her shop features adorable and functional upcycled items for children and grown-ups alike.  I've personally had my eye on one of the latest editions to her shop, crocheted reusable dust/mop covers for Swiffer mops.  She also makes beautiful clothing items and toys for the littlest members of your family.  Be sure to check out all the links at the close of this post.

Tell us a bit about yourself:
I live with my husband, one year old son, and a menagerie of four dogs, two cats, two ducks, and eleven chickens on a small farm in South Pennsylvania.  My husband and I are both teachers, although I am currently a stay-at-home-mom. My Etsy shop, Crunchy Farm Baby, is a place for me to share some of my favorite homemade items that I've made for my son.  I also blog at www.crunchyfarmbaby.com, where I share ecofriendly tips and tricks.

What was your inspiration for using upcycled materials for your craft or art?
I grew up in a family where we didn't throw things away if they had any use left in them, and that's carried over into the way I raise my family now.  Just because a shirt can't be worn as a shirt anymore doesn't mean that it can't be a doll, or a baby hat, or even rags for the kitchen!  It's such a good feeling to be able to use something for more than just its intended purpose.

What is your favorite upcycled medium or material?
I love working with old sweaters.  Where most people see tattered and torn rags, I see baby pants, monsters, jingle balls, and so much more!

What are some challenges you have encountered using upcycled materials?
The biggest challenge for me has been realizing that you just can't have two items that are exactly the same.  When you're working with upcycled materials, you have to understand that there's going to be variations in each masterpiece that you create.  I love the uniqueness of each piece when it's finished, but it can be frustrating at times when working with it.

What is your current favorite upcycled item you have created?
I think I'd have to say that my baby sun hats are probably my favorite.  It might just be that my son models them so well, though!  Haha!


Any tips for those looking into the use of upcycled materials:
Use your imagination!  Almost anything can be repurposed into something else.  It doesn't even have to be something super crafty.  Old yogurt containers are great for planting seedlings in the Spring for example.  Just don't be quick to toss something that could find another life!


Leah can be found online in the following locations:


Sunday, October 21, 2012

Seasonal Fun!

When walking into any grocery store these days, you will easily find all you need for a fun, sensory/fine motor experience for your little ones.


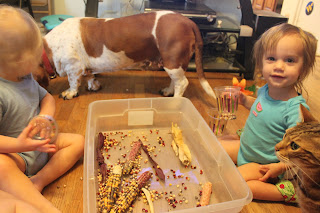
Today we will be working with dried corn on the cob that is often used for decoration this time of year.  Along with the corn, you will need a small tub and some plastic cups or other form of small containers.


Begin by simply allowing your children to explore the corn.  With a little prompting from you, they will discover that the individual kernels of corn can be popped off quite easily. 


This task supports fine motor development in young children.  Sean was very devoted to removing each and every kernel from the cob. 

Once your children have liberated a good amount of kernels from the cob, you may introduce the plastic cups.  At this point it's great to simply stand back and let them figure out what to do. 


Isabel quickly discovered that the kernels made a tapping/rattling noise when they dropped into the cup.  She carefully began shaking the cup to make music.  For children not as careful as Isabel, closed containers may be beneficial for shaking opportunities.  Sean enjoyed the sound the kernels made as he dumped them from his cup into the larger tub.


This activity provides such a rich sensory experience, touching and feeling the corn, smelling the corn cobs and hearing them tap, tap against the plastic cups and container.


Unfortunately Isabel and Sean also felt the need to give this corn a taste too!  They quickly decided that it was not for them.  Isabel then discovered a new challenge: spitting the kernels into the cup.  She had great aim!

Take advantage of nature's bounty this autumn and introduce your children to this fun sensory experience.

Saturday, October 13, 2012

Bring the Outdoors in: Leaf Prints

It's time to go collecting again!  For this month's activities, we will be taking advantage of the beautiful fall foliage.  To complete this activity you will need: leaves, paper, a flat working surface, tape and crayons with the papers removed.


Hand your children their collecting baskets and ask them to collect as many leaves as they would like.  Encourage them to notice the new colors of the leaves and the variety of shapes and sizes.


Once you are satisfied with your leaf collection, head indoors for this simple art activity.


If you are working with children under the age of 3 start by selecting a couple leaves and taping them to your work space.  Older children will be able to keep the leaves in place on their own.


Tape a piece of paper or two down on top of your leaves.  Now that your station is set up, invite your children to join you.


Demonstrate to your child hold to hold the crayon sideways to rub over the leaf.


Once complete, you will get a print that looks something like this!  They are great for framing and using for festive fall decoration about your home.

 Before or after completing this activity, here are a few great books about leaves and fall that you can read with your children:

Fall Leaves Fall

Red Leaf, Yellow Leaf

Look What I Did With a Leaf
(This book has some other great leaf activity ideas!)

Saturday, October 6, 2012

Upcycle Monthly: Featuring Kellie from The Indigo Forest

Let's all take a moment to welcome Kellie from The Indigo Forest on Etsy.  Her shop features beautiful items for children, parents and even a few things for your family pet!  I've sampled some wool dryer balls from her shop and have even converted my non-ecofriendly husband over to using them with some essential oils.  Be sure to check out the links at the close of this post to find Kellie online.

Tell us a bit about yourself:
My name is Kellie and I am the owner of The Indigo Forest on Etsy. I live in beautifully lush, central North Carolina with my husband, two little boys with another little one on the way!


What was your inspiration for using upcycled materials for your craft or art?
Simply knowing that you can make something new out of something that someone else had discarded is inspiration enough for me. The possibilities are endless! I try to see something new in every bit of recycled material I find.

What is your favorite upcycled medium or material?
My favorite upcycled medium definitely has to be wool. There are just so many different kinds of wool out there! For example, some are very soft - those types are great for stuffed toys for children.


What are some challenges you have encountered using upcycled materials?
Hmmm…I would have to say that finding my favorite material, wool, can be hard at times. Usually it’s only to be found during the colder months in my local thrift store.

What is your current favorite upcycled item you have created?
When I used cloth diapers for my children, my homemade wool longies were my favorite thing I’ve created to use! They work wonders with cloth diapers and they double as pants. You just can’t beat that.

Any tips for those looking into the use of upcycled materials:
The best tip I can suggest is to check out your local thrift stores/garage sale/yard sales/etc.. I am very fortunate to have a truly amazing thrift store in my town. (one that I visit very often!)


Kellie can be found online in the following locations:

Sunday, September 9, 2012

Bring the Outdoors in: Herb Potpourri


With our trusty collection baskets in hand, Isabel, Sean and I headed for our herb garden to collect the makings for an herbal potpourri!  Items needed: collecting basket, herb garden, small containers for potpourri.  Old baby food jars work great and are the perfect size for little hands.


Isabel and Sean got right to work picking as many herbs as they could.


They paused frequently the give the herbs a sniff.  As your child is taking time to, "Stop and smell the roses", be sure that you are identifying each individual herb they are smelling.  Thus extending their learning experience and expanding their vocabulary.


Once a suitable amount of herbs have been collected, it is time to head to your indoor work space.  There really is no recipe for this potpourri.  You can use whatever herbs you have on hand.  Hardy perennial herbs do work best though: Thyme, rosemary, sage, oregano, or lavender for example.


Encourage your children to begin tearing the herbs into small pieces to place into your potpourri containers.  We didn't have any baby food jars on hand, but really any small beautiful container will do.  Be sure to carefully supervise young children if using glass or ceramic containers.  This is an opportunity to help them learn about using gentle hands and treating fragile items carefully.


Isabel giving her completed potpourri, a final sniff test.


Once your potpourri is complete, find it a home in your kitchen, dinning room or bathroom.  It will add a beautiful scent to any space.  Guests arriving to your home will imagine you must be cooking up something tasty.  Once the potpourri seems to be losing its muster, simply pick a few more herbs to add in.


Christine can be found online in the following locations: Facebook, Blogger and her Etsy shop:


Saturday, September 1, 2012

Upcycle Monthly: Featuring Michelle from Kissing Bunnies

Let's take a moment to welcome Michelle from the etsy shop Kissing Bunnies.  She creates a wide range of items for both children and grown-ups.  My children are currently both the owners of cloth diapers made by Michelle that they adore.  Once you've taken some time to learn more about Michelle, her craft and her passion for upcycling, please take a moment to visit her etsy shop, facebook page and blog linked at the close of this post.
  
Tell us a bit about yourself. 
         I am Michelle Triplett, I am from Tenino, Washington, a town that is so small we finally became a dot on a map in 1987. The united states army uses the map of tenino to teach it's map reading course (because it has all the major land features needed in one space) Although they don't know how to pronounce Tenino, I am sure not many people would be able to off the bat. Tenino is pronounced T-9-O.  I grew up so far out in the sticks of Tenino that we did not have electricity for a good amount of years. We finally did get it later, but it was quite the experience to learn to function without electricity. We raised horses and I became a horse trainer at the age of 14. I was very good at working horses and miss it terribly. I threw my back out when I turned 30 and have been nursing the back injury ever since. So no horses for me. I needed a new career and thus I picked up sewing. I had always wanted to have those awesome show clothes they have at horse shows and decided I would learn how to make them. If I couldn't wear them anymore why not be able to make them for others to look good in. Also to make them affordable too. Those clothes get so expensive. 
          I started sewing professionally at 32 and haven't looked back. My Etsy shop is really just things I have sewn too many of and have extra of. I would like to one day own a brick and mortar shop but I see that as something a long way off. Right now I do mainly custom orders, I can sew basically anything from show clothes, to curtains at huge horse shows, to diapers for babies bottoms. I really do enjoy sewing and am glad I came in to it when I did and now have a career that I can do and stay home at the same time.
           I am also a professional sax player in a band. We play big band jazz music. I never imagined I could accomplish this but it worked out perfectly. I couldn't be more happy. Our director is the curator of the band, he has had this band since he was 14 and is now 86 and still playing lead sax with us. True inspiration there. 
           At the age of 23 I was married, in the United States Army as a Truck driver, I had twins on my first baby. One twin passed. Then I had a second daughter Alexis who passed at 2.5 months. I got out of the army, tucked my tail and came home. Trying to figure out what to do with my life then. I became a single mom when my husband found the love of another woman. I learned a lot about myself during that time. I met a man 6 years later and we now have a little boy together. We are getting married this August. He allows me to stay home, mainly because I am nursing this back issue, but also to raise our son and heal my broken soul. He really is a wonderful man. 

What was your inspiration for using upcycled materials for your craft or art?
          My biggest inspiration for upcycling  materials comes in the form of a short story. 
When I was young and wanted a fort to play in we didn't have money to buy materials so I would steal a panel off the side of the barn, and hoist it up in a tree with a Y branch. Just before my parents would get home I would put the panel back and hammer it back into place with a rock. We had built a 6 stall horse barn from the trees in the pasture. So that is how I knew the panel was there and easily taken off. I guess upcycling was just second nature to me.  The best part of upcycling is you can sometimes get two birds with one stone. When we built the barn from the trees we also cleared out room for an area. So two for one.
Let's take a moment to welcome Michelle from Kissing Bunnies on Etsy.  She creates a wide range of items for both children and grown-ups.  My children each currently own a cloth diaper made by Michelle that they adore.  Once you've taken a moment to learn a little more about Michelle, her craft and her passion for upcycling, be sure to follow the links to her shop, blog and facebook page found at the close of this post.
 
What is your favorite upcycled medium or material?
          Anything I can find that someone doesn't want. I can literally see something in the raw form and think of what it is going to look like when it is done. I was taught that skill when riding horses. We would have to judge a horse on it's potential vs it's current form. I never had a horse more than a year as I was allowed to lease nags from the pasture. This started me in the diamond in the rough point of view I have now. I had to learn to see a horse for what it might become.

What are some challenges you have encountered using upcycled materials?
          I honestly think the only challenge I have encountered with upcycled material is sometimes I don't have enough and I can't go get more because that is all there was. 

What is your current favorite upcycled item you have created? 
          I made a horse a blanket out of old blankets, flannel, and scraps. I don't have a picture any longer but it was super fun to make. I hand sewed it together it took me almost all summer and autumn to get it done. It was super ugly though. It was just something to keep him warm. It lasted about a day and he had it in shreds then next morning when I went out to the barn. So to say the least he didn't appreciate it nearly as much as me. 
          I once pulled a dresser out of the dumpster and turned it into a hamster cage. Two stories for each hamster, so two hamsters total, and on top was storage for all the gear they use. And built in fish tanks. It was already painted a very nice teal color and worked perfectly in our house. Someone bought it from me for $200 too. That was after two years of use. I was really suprised to be able to sell it, I would of given it away but the lady really wanted to buy it from me. 

Any tips for those looking into the use of upcycled materials.
          Dumpster diving is not a bad thing, it can be stinky so wear a different set of clothes, but sometimes you can find the most amazing things. Also the second hand shops are wonderful places. Or if you want you can visit with an older seamstress and conn her out of some fabric she will never get around to using. Grandma's are wonderful for this. Anyone with an old time sewing machine in their house will most likely be willing to part with some beautiful fabric.

Michelle can be found online in the following locations:

Saturday, August 4, 2012

Upcycle Monthly: Featuring Haleigh from My Little Mookie

Let's all take a moment to welcome Haleigh from My Little Mookie on Etsy.  She is also one of the many talented crafters of the etsykids team.  Her shop features adorable, customized baby, toddler and even a few grown up items.  Stop on by her shop to take a look at all the beautiful appliqued and monogrammed items she creates after learning a little more about her here.  The links to her shop and facebook page can be found at the close of this post.

Tell us a bit about yourself.
I am a stay at home mom and wife from Plano, Texas and I am the owner of My Little Mookie, a fun and unique baby clothing and accessories company. I have an energetic 18 month old that loves to help mommy create!

What was your inspiration for using upcycled materials for your craft or art?
Here at our house we recycle everything! I had purchased some Toms that came with a cute fabric bag, I thought "How can I use this in my crafts?" It all started with a necktie applique, then a guitar, then a flower headband. I love it because you would not think this would work with babies clothes...but the bags wash beautifully and become very soft over time. I have made my son several other items not listed on Etsy and have been very pleased with them. I love taking something that someone was throwing away or my selvages and giving them a new life!

What is your favorite upcycled medium or material?
Old sweatshirts make for perfect backing to bibs and of course the fabric bags that come with a pair of Toms. Anything I can get my hands on really.

What are some challenges you have encountered using upcycled materials?
I haven't had any challenges yet, but as I expand my line of products I am sure I will run into some. One challenge that I can forsee in the future is if Toms stops giving away free bags with their shoes! I am in the process of trying to make my own onesies out of vintage t-shirts.

What is your current favorite upcycled item you have created?
I love this fabric flower headband! It was so much fun to make!

Any tips for those looking into the use of upcycled materials.
You never know if something is going to work until you try! I waste as little as possible. I have even made my own business cards out of cardboard and fabric! 
Haleigh can be found online in the following locations:


Thanks for helping reduce waste in the world all while creating beautiful one of a kind items!

Saturday, July 14, 2012

Bring the Outdoors in: Stick Sculptures

It's time to find your collecting baskets again for this latest installment of Bring the Outdoors In.  Today we will be heading outdoors to collect sticks of varying lengths and shapes.  All you will need to complete this project is, a basket for collecting, sticks and salt dough. A recipe for making salt dough can be found here


Set your little ones to work collecting sticks to fill their basket.  I showed Sean and Isabel how to carefully break the sticks in half if they were too big.  Isabel was particularly fond of this activity.  With older children, you can encourage them to find sticks of varying shapes and sizes.  Ask them to consider what they would like to create using their sticks.


Once you are satisfied with the sticks you have collected, head indoors to your work space.


Introduce your children to the salt dough and demonstrate how to push the sticks into the dough.  Once they have the idea, step back and watch the artists at work.  With young toddlers and preschoolers, they will enjoy simply poking the sticks into a big, sturdy hunk of dough.  Older children can be shown how to roll the dough into small balls to connect two sticks together to create more detailed/representational sculptures.


Sean clapped with joy and pride each time he was able to successfully poke a stick into the dough and make it stand up.


Once your children have completed their sculptures, place it in a sunny spot to air dry.  This dough will usually take about 1-2 days to air dry depending on thickness.  Even toddlers are able to create beautiful abstract art using natural materials.  Once dried, salt dough can be painted using tempra paint to add another layer of beauty to your sculpture.


These sculptures can be brought back to nature and used to decorate your outdoor spaces as a picnic table centerpiece, or even place them in your own vegetable or flower garden to add a bit of whimsy to the space.


Christine can be found online on her blog Belly Bear Baby Gear, facebook, and her etsy shop:


Saturday, July 7, 2012

Upcycle Monthly: Featuring Mary from Frayed Fuzzies

 Let's take a moment to welcome Mary from Frayed Fuzzies on Etsy.  She is also a fellow Etsykids team member.  Her shop is comprised of a variety of handmade children, teen and adult items.  She creates beautiful customized keepsake/memory T-shirt quilts using upcycled T-shirts.  After learning more about Mary, be sure to check out her shop and see if something there strikes your fancy.  Links to each of  her online sites can be found at the close of this interview.

Tell us a bit about yourself:
I am originally from St. Louis, MO, but I now live in Cincinnati, OH.  I have had formal training in sewing and costume making (I work in technical theatre by day....and sometimes by night), but also come from a long line of quilters.  I'm at least 4th generation. 

What was your inspiration for using upcycled materials for your craft or art?
My background in costuming was a big influence.  I have worked for a lot of theatres that had shoe-string budgets, and being able to make something completely different or new out of existing materials or garments is vital when you're trying to count pennies and keep the producer happy. 

What is your favorite upcycled medium or material?
I love working with denim.  Worn denim is so soft, and when I turn it into something rag quilted, it frays so nicely, and looks fabulous!


What are some challenges you have encountered using upcycled materials?
Occasionally I will get a piece that a customer would like included in a memory or T-shirt quilt that is a bit unconventional.  Usually after some thought and planning, I can incorporate it no problem.  But there are some items that I just won't include, due to wear or extra strain that could be put on a delicate item.


What is your current favorite upcycled item you have created?
This will probably always be my favorite, because it has sentimental value to me.  I made a small quilt out of my T-shirts from drama club in high school.  I have fabulous memories from all the shows and parties, and if it weren't for my drama teacher, I never would have pursued theater as a professional career.


Any tips for those looking into the use of upcycled materials.
Have fun with it!  One of my favorite parts of creating is seeing a pile of junk, or fabric, or random finds, and coming up with ways they can go together to make something new and fabulous.  As great as reusing old or worn-out items are, you still have to be careful that they're not too worn out.  If they are, your new item may not be of the best quality it could be.


Mary can be found online in the following locations:
Frayed Fuzzies Seasonal Newsletter

Thanks for helping reduce waste in the world all while creating beautiful one of a kind items!


Wednesday, June 27, 2012

Playdough Fun: Sensory activity

Most parents of young children probably have their own fond memories of using playdough as a child.  The first time I opened a container for my little ones, my husband smiled, "Ah playdough.  I remember that smell."  Playdough provides children with such a full sensory opportunity, it is an experience they will remember even into adulthood.


When letting your little ones explore the wonders of playdough, think outside the box and find some common household items to use with the playdough.  During our most recent playdough exploration, I gave my children chopsticks and containers with lids to experiment with.

To my delight and theirs, they found many uses for these tools.


They poked the playdough to pick it up, used the chopsticks to cut the playdough and even pretended to do a little eating.  They have watched mommy and daddy eat with chopsticks helping them make this connection.  Luckily enough they both got the idea of pretend eating.  The containers provided more opportunities for fine motor growth as Sean and Isabel explored the concept of filling the containers with all the playdough and then had to line the lids up with the bowls to cover the dough.


Isabel was most interested in mushing and tearing the playdough with her fingers.  She is beginning to discover how to roll the dough into a ball.

Giving your children common household tools to use with playdough expands their learning experiences.

Playing with playdough meets many MA DOE Guidelines for Preschool Learning Experiences:

Physical Development:
- Use a variety of tools and materials to build grasp-and-release skill.

- Build finger dexterity.

-Use eye-hand coordination, visual perception and tracking, and visual motor skills in play activities.

Visual Arts:
- Explore a variety of age-appropriate materials and media to create two and three-dimensional artwork.

If you are looking to save a little dough (pun intended), you can easily make your own playdough using recipes found here.  The ingredients to make playdough will probably already be in your pantry.  The first recipe listed is your typical run of the mill playdough, but there are a few fun varieties on the old standard as well. 

Saturday, June 16, 2012

Bring the Outdoors in: Beautiful Things - Collecting and Sorting


Items found in nature contain such beauty, and children seem to be particularly attuned to this beauty. With only a few simple items, you can encourage your children to participate in this fun and educational nature based activity.

All you will need is a paper bag (or other collecting vessel), an empty egg carton and the great outdoors!

Begin by giving your child a paper bag and bringing them outside. A walk in the woods would provide for some great diverse items for collection, but as you will see, your own back yard will do just fine.


If you are working with young children, you may need to show them what to do by placing a few items in their bag for them. Encourage them to collect as many small three dimensional items as they'd like.


Sean was particularly drawn to this patch of grass and rocks in our yard. He discovered big and little rocks as well as a few left over acorn caps. As your child collects more items, this is an opportunity for you to build their nature vocabulary by naming and labeling what they are collecting.


Once your bags are nice and full bring them inside and pour the contents into the top portion of your egg carton.


Sit back for a moment and enjoy the spoils of all your hard work. Allow your child to study the items and consider how they may be sorted.


Young toddlers will simply enjoy exploring the items and filling the cups in the egg carton at random. You can begin encouraging them to notice the similarities and differences by explaining "Let's put all the rocks together" or "Look at all the pink petals".


When working with older children you can encourage more advanced sorting skills. Allow them to study what they have collected and decide how they will sort the beautiful things they have found. They may decide to sort by color placing all the brown things and pink things together, or they may decide sorting by type of object makes the most sense for them.


This activity will encourage your child to begin developing their mathematical thinking skills such as sorting objects varying by one or two attributes all the while enjoying the natural objects they collected. Take a moment to enjoy the beauty found outside with your children and help foster the next generation of nature lovers.


Christine can be found online on facebook, and her etsy shop:


Friday, June 8, 2012

Mail organizer tutorial


Looking for a way to tame those frustrating mounds of mail piling up on your counters?  I sure was.  Hopefully this tutorial will help you create a solution.  All you will need is an old cereal box, about a 1/2 to 3/4 yard of fabric, a 12" piece of ribbon, scissors, a tape measure and a sewing machine.


Let's get to it.  To begin cut both the front and back sections off of your cereal box.


Cut the back of the box in half.  These two pieces will be your mail pouches.


It is now time to cut the fabric to cover your cereal box with.  When measuring the fabric, allow yourself a 1/2" all the way around to give yourself a seam allowance.  The fabric should be double the width of each piece of cardboard so it can cover the front and back of the cereal box pieces.  Repeat this process for all three pieces of the cereal box.


Now you can begin sewing.  Fold the pieces of fabric for the two mail pouches in half with the right sides of the fabric touching and sew the short sides closed taking a 1/4" seam allowance.  Turn the fabric right side out. This then creates a lovely little pocket to slide the cardboard into.  Once the cardboard is in the pocket, fold the open sides under and sew closed.  I am not a fan of ironing, but if you feel inclined, you can press the fabric seams before sewing.


Next find your largest piece of fabric that has not yet been sewn, and measure down 2.5" from the top.  Place one of your sewn pockets at this location and then sew the bottom and short sides of the pocket to your back fabric.  You have just created your first mail pouch.


Next you will fold the large piece of fabric in half with the right side of the fabric touching and sew the sides closed just as you did for the individual pouches.  The pouch that you sewed on previously will be on the inside.  Once you have sewn the sides closed, you will turn the entire thing right side out.  Next you will sew your remaining mail pouch onto the bottom (the closed end) of your mail carrier just as you attached the first mail pouch.  The bottom pouch will slightly overlap the upper pouch.

 You are now in the home stretch.  Slide the front piece of the cereal box into the large pocket you have created.  This will provide your mail carrier with structure and stability.


Using a piece of ribbon, you will create a loop to hang your mail carrier from.  Fold the open side of the carrier under and pin the ribbon in between the two layers of fabric about 1" from each edge.  Sew the top closed attaching the ribbon as well.


Now take a moment to pat yourself on the back!  You have created your very own mail carrier.  Find yourself an empty nail to hang this on or a sturdy magnet clip on your refrigerator.  Enjoy. 

Saturday, June 2, 2012

Upcycle Monthly: Featuring Andrea from Bula Jeans Boutique

Let's welcome Andrea from Bula Jeans Boutique as she shares some of her amazing upcycled items with us.  Her shop features a wide variety of items for babies, toddlers, children and a few things for mom too!  Be sure to check out the links to Andrea's etsy shop and facebook page after learning more about her.

Tell us a bit about yourself. 
My name is Andrea Boyko, I was an inner-city school teacher for 10 years and am currently a very busy work-at-home mommy.  I run Bula Jean’s Boutique – a little etsy shop dedicated to making quality baby items from a mix of repurposed, organic, and natural materials.


What was your inspiration for using upcycled materials for your craft or art?
I have always had a problem with the amount people waste.  From plastic silverware, water bottles, and even clothing – there is just too much stuff out there!  For me upcycling is not about the cost savings (which are significant), but about making do with what we already have. 


What is your favorite upcycled medium or material?
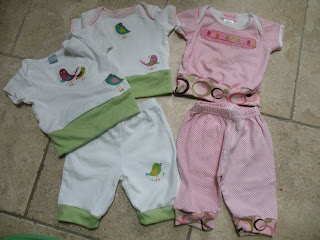
Right now my favorite thing to do is repurposing outgrown or stained onesies .  My twins outgrow onesies so quickly and since I know my husband and I will not be having more children I have no problem cutting them up and making them into new outfits.  Here is a picture of some onesies turned into t-shirts and some footie-pjs turned into comfy capris.


The upcycled material I use the most is old tweed pants that I turn into Newsboy Caps.  The lady at my local Salvation gives me the strangest looks when I come in every couple of weeks to buy a pile of old “grandpa” pants!  One of these days I will have to tell her that I don’t actually wear them.

What are some challenges you have encountered using upcycled materials?
My biggest challenge is actually on the customer’s end.  They never know exactly what color or fabric their item will be because my upcycled materials change weekly. 

What is your current favorite upcycled item you have created?
I really love my new beach bag made from plastic bags. It is sturdy, waterproof, and best of all saved about 60 plastic shopping bags from ending up in the landfills and oceans.   Since I don’t use plastic bags myself, I collected them from people who still do.  
 

Andrea can be found online at the following locations:


Thanks for helping reduce waste in the world all while creating beautiful one of a kind items!