Wednesday, June 27, 2012

Playdough Fun: Sensory activity

Most parents of young children probably have their own fond memories of using playdough as a child.  The first time I opened a container for my little ones, my husband smiled, "Ah playdough.  I remember that smell."  Playdough provides children with such a full sensory opportunity, it is an experience they will remember even into adulthood.


When letting your little ones explore the wonders of playdough, think outside the box and find some common household items to use with the playdough.  During our most recent playdough exploration, I gave my children chopsticks and containers with lids to experiment with.

To my delight and theirs, they found many uses for these tools.


They poked the playdough to pick it up, used the chopsticks to cut the playdough and even pretended to do a little eating.  They have watched mommy and daddy eat with chopsticks helping them make this connection.  Luckily enough they both got the idea of pretend eating.  The containers provided more opportunities for fine motor growth as Sean and Isabel explored the concept of filling the containers with all the playdough and then had to line the lids up with the bowls to cover the dough.


Isabel was most interested in mushing and tearing the playdough with her fingers.  She is beginning to discover how to roll the dough into a ball.

Giving your children common household tools to use with playdough expands their learning experiences.

Playing with playdough meets many MA DOE Guidelines for Preschool Learning Experiences:

Physical Development:
- Use a variety of tools and materials to build grasp-and-release skill.

- Build finger dexterity.

-Use eye-hand coordination, visual perception and tracking, and visual motor skills in play activities.

Visual Arts:
- Explore a variety of age-appropriate materials and media to create two and three-dimensional artwork.

If you are looking to save a little dough (pun intended), you can easily make your own playdough using recipes found here.  The ingredients to make playdough will probably already be in your pantry.  The first recipe listed is your typical run of the mill playdough, but there are a few fun varieties on the old standard as well. 

Saturday, June 16, 2012

Bring the Outdoors in: Beautiful Things - Collecting and Sorting


Items found in nature contain such beauty, and children seem to be particularly attuned to this beauty. With only a few simple items, you can encourage your children to participate in this fun and educational nature based activity.

All you will need is a paper bag (or other collecting vessel), an empty egg carton and the great outdoors!

Begin by giving your child a paper bag and bringing them outside. A walk in the woods would provide for some great diverse items for collection, but as you will see, your own back yard will do just fine.


If you are working with young children, you may need to show them what to do by placing a few items in their bag for them. Encourage them to collect as many small three dimensional items as they'd like.


Sean was particularly drawn to this patch of grass and rocks in our yard. He discovered big and little rocks as well as a few left over acorn caps. As your child collects more items, this is an opportunity for you to build their nature vocabulary by naming and labeling what they are collecting.


Once your bags are nice and full bring them inside and pour the contents into the top portion of your egg carton.


Sit back for a moment and enjoy the spoils of all your hard work. Allow your child to study the items and consider how they may be sorted.


Young toddlers will simply enjoy exploring the items and filling the cups in the egg carton at random. You can begin encouraging them to notice the similarities and differences by explaining "Let's put all the rocks together" or "Look at all the pink petals".


When working with older children you can encourage more advanced sorting skills. Allow them to study what they have collected and decide how they will sort the beautiful things they have found. They may decide to sort by color placing all the brown things and pink things together, or they may decide sorting by type of object makes the most sense for them.


This activity will encourage your child to begin developing their mathematical thinking skills such as sorting objects varying by one or two attributes all the while enjoying the natural objects they collected. Take a moment to enjoy the beauty found outside with your children and help foster the next generation of nature lovers.


Christine can be found online on facebook, and her etsy shop:


Friday, June 8, 2012

Mail organizer tutorial


Looking for a way to tame those frustrating mounds of mail piling up on your counters?  I sure was.  Hopefully this tutorial will help you create a solution.  All you will need is an old cereal box, about a 1/2 to 3/4 yard of fabric, a 12" piece of ribbon, scissors, a tape measure and a sewing machine.


Let's get to it.  To begin cut both the front and back sections off of your cereal box.


Cut the back of the box in half.  These two pieces will be your mail pouches.


It is now time to cut the fabric to cover your cereal box with.  When measuring the fabric, allow yourself a 1/2" all the way around to give yourself a seam allowance.  The fabric should be double the width of each piece of cardboard so it can cover the front and back of the cereal box pieces.  Repeat this process for all three pieces of the cereal box.


Now you can begin sewing.  Fold the pieces of fabric for the two mail pouches in half with the right sides of the fabric touching and sew the short sides closed taking a 1/4" seam allowance.  Turn the fabric right side out. This then creates a lovely little pocket to slide the cardboard into.  Once the cardboard is in the pocket, fold the open sides under and sew closed.  I am not a fan of ironing, but if you feel inclined, you can press the fabric seams before sewing.


Next find your largest piece of fabric that has not yet been sewn, and measure down 2.5" from the top.  Place one of your sewn pockets at this location and then sew the bottom and short sides of the pocket to your back fabric.  You have just created your first mail pouch.


Next you will fold the large piece of fabric in half with the right side of the fabric touching and sew the sides closed just as you did for the individual pouches.  The pouch that you sewed on previously will be on the inside.  Once you have sewn the sides closed, you will turn the entire thing right side out.  Next you will sew your remaining mail pouch onto the bottom (the closed end) of your mail carrier just as you attached the first mail pouch.  The bottom pouch will slightly overlap the upper pouch.

 You are now in the home stretch.  Slide the front piece of the cereal box into the large pocket you have created.  This will provide your mail carrier with structure and stability.


Using a piece of ribbon, you will create a loop to hang your mail carrier from.  Fold the open side of the carrier under and pin the ribbon in between the two layers of fabric about 1" from each edge.  Sew the top closed attaching the ribbon as well.


Now take a moment to pat yourself on the back!  You have created your very own mail carrier.  Find yourself an empty nail to hang this on or a sturdy magnet clip on your refrigerator.  Enjoy. 

Saturday, June 2, 2012

Upcycle Monthly: Featuring Andrea from Bula Jeans Boutique

Let's welcome Andrea from Bula Jeans Boutique as she shares some of her amazing upcycled items with us.  Her shop features a wide variety of items for babies, toddlers, children and a few things for mom too!  Be sure to check out the links to Andrea's etsy shop and facebook page after learning more about her.

Tell us a bit about yourself. 
My name is Andrea Boyko, I was an inner-city school teacher for 10 years and am currently a very busy work-at-home mommy.  I run Bula Jean’s Boutique – a little etsy shop dedicated to making quality baby items from a mix of repurposed, organic, and natural materials.


What was your inspiration for using upcycled materials for your craft or art?
I have always had a problem with the amount people waste.  From plastic silverware, water bottles, and even clothing – there is just too much stuff out there!  For me upcycling is not about the cost savings (which are significant), but about making do with what we already have. 


What is your favorite upcycled medium or material?
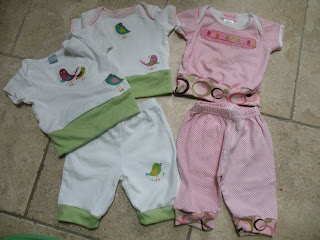
Right now my favorite thing to do is repurposing outgrown or stained onesies .  My twins outgrow onesies so quickly and since I know my husband and I will not be having more children I have no problem cutting them up and making them into new outfits.  Here is a picture of some onesies turned into t-shirts and some footie-pjs turned into comfy capris.


The upcycled material I use the most is old tweed pants that I turn into Newsboy Caps.  The lady at my local Salvation gives me the strangest looks when I come in every couple of weeks to buy a pile of old “grandpa” pants!  One of these days I will have to tell her that I don’t actually wear them.

What are some challenges you have encountered using upcycled materials?
My biggest challenge is actually on the customer’s end.  They never know exactly what color or fabric their item will be because my upcycled materials change weekly. 

What is your current favorite upcycled item you have created?
I really love my new beach bag made from plastic bags. It is sturdy, waterproof, and best of all saved about 60 plastic shopping bags from ending up in the landfills and oceans.   Since I don’t use plastic bags myself, I collected them from people who still do.  
 

Andrea can be found online at the following locations:


Thanks for helping reduce waste in the world all while creating beautiful one of a kind items!